Getting started with ddugit
Install ddugit, open or clone your first repository, and learn what each part of the window is for. It takes a few minutes, and you need no account.
Updated
Install
ddugit runs on macOS 11 or later (Apple silicon and Intel) and on 64-bit Windows 10 or later. Get it from the download page.
macOS
- Download macOS (.dmg) and open it.
- Drag ddugit into Applications.
- Open it. The app is notarized by Apple, so it starts without a warning.
Windows
- Choose Windows (Microsoft Store) and install ddugit from the Store.
- Open it from the Start menu. The Store keeps it up to date.
If your PC has no Microsoft Store, use the .exe installer linked under the download buttons. It isn't code-signed, so Windows may show “Windows protected your PC”. Choose More info, then Run anyway. This version updates itself from inside the app (see updates).
Git comes first
ddugit reads your repositories on its own, but it uses the Git installed on your computer for every change: commits, merges, pushes and the rest. Install Git from git-scm.com before you start, if you don't have it.
If ddugit can't run Git when it starts, it shows Git not found with four buttons: Download Git opens the Git website, Check again looks once more after you install it, Set Git location takes you to Settings → Git, and Close dismisses the dialog.
On macOS, apps opened from Finder may not see your terminal's PATH. If Git works in Terminal but not in ddugit, open Settings → Git, enter the full path in Git executable (for example /opt/homebrew/bin/git) and click Verify and apply. Leave the field empty to use git from PATH.
Open a repository you already have
The start screen offers three ways in, and you can also drop a folder on the window:
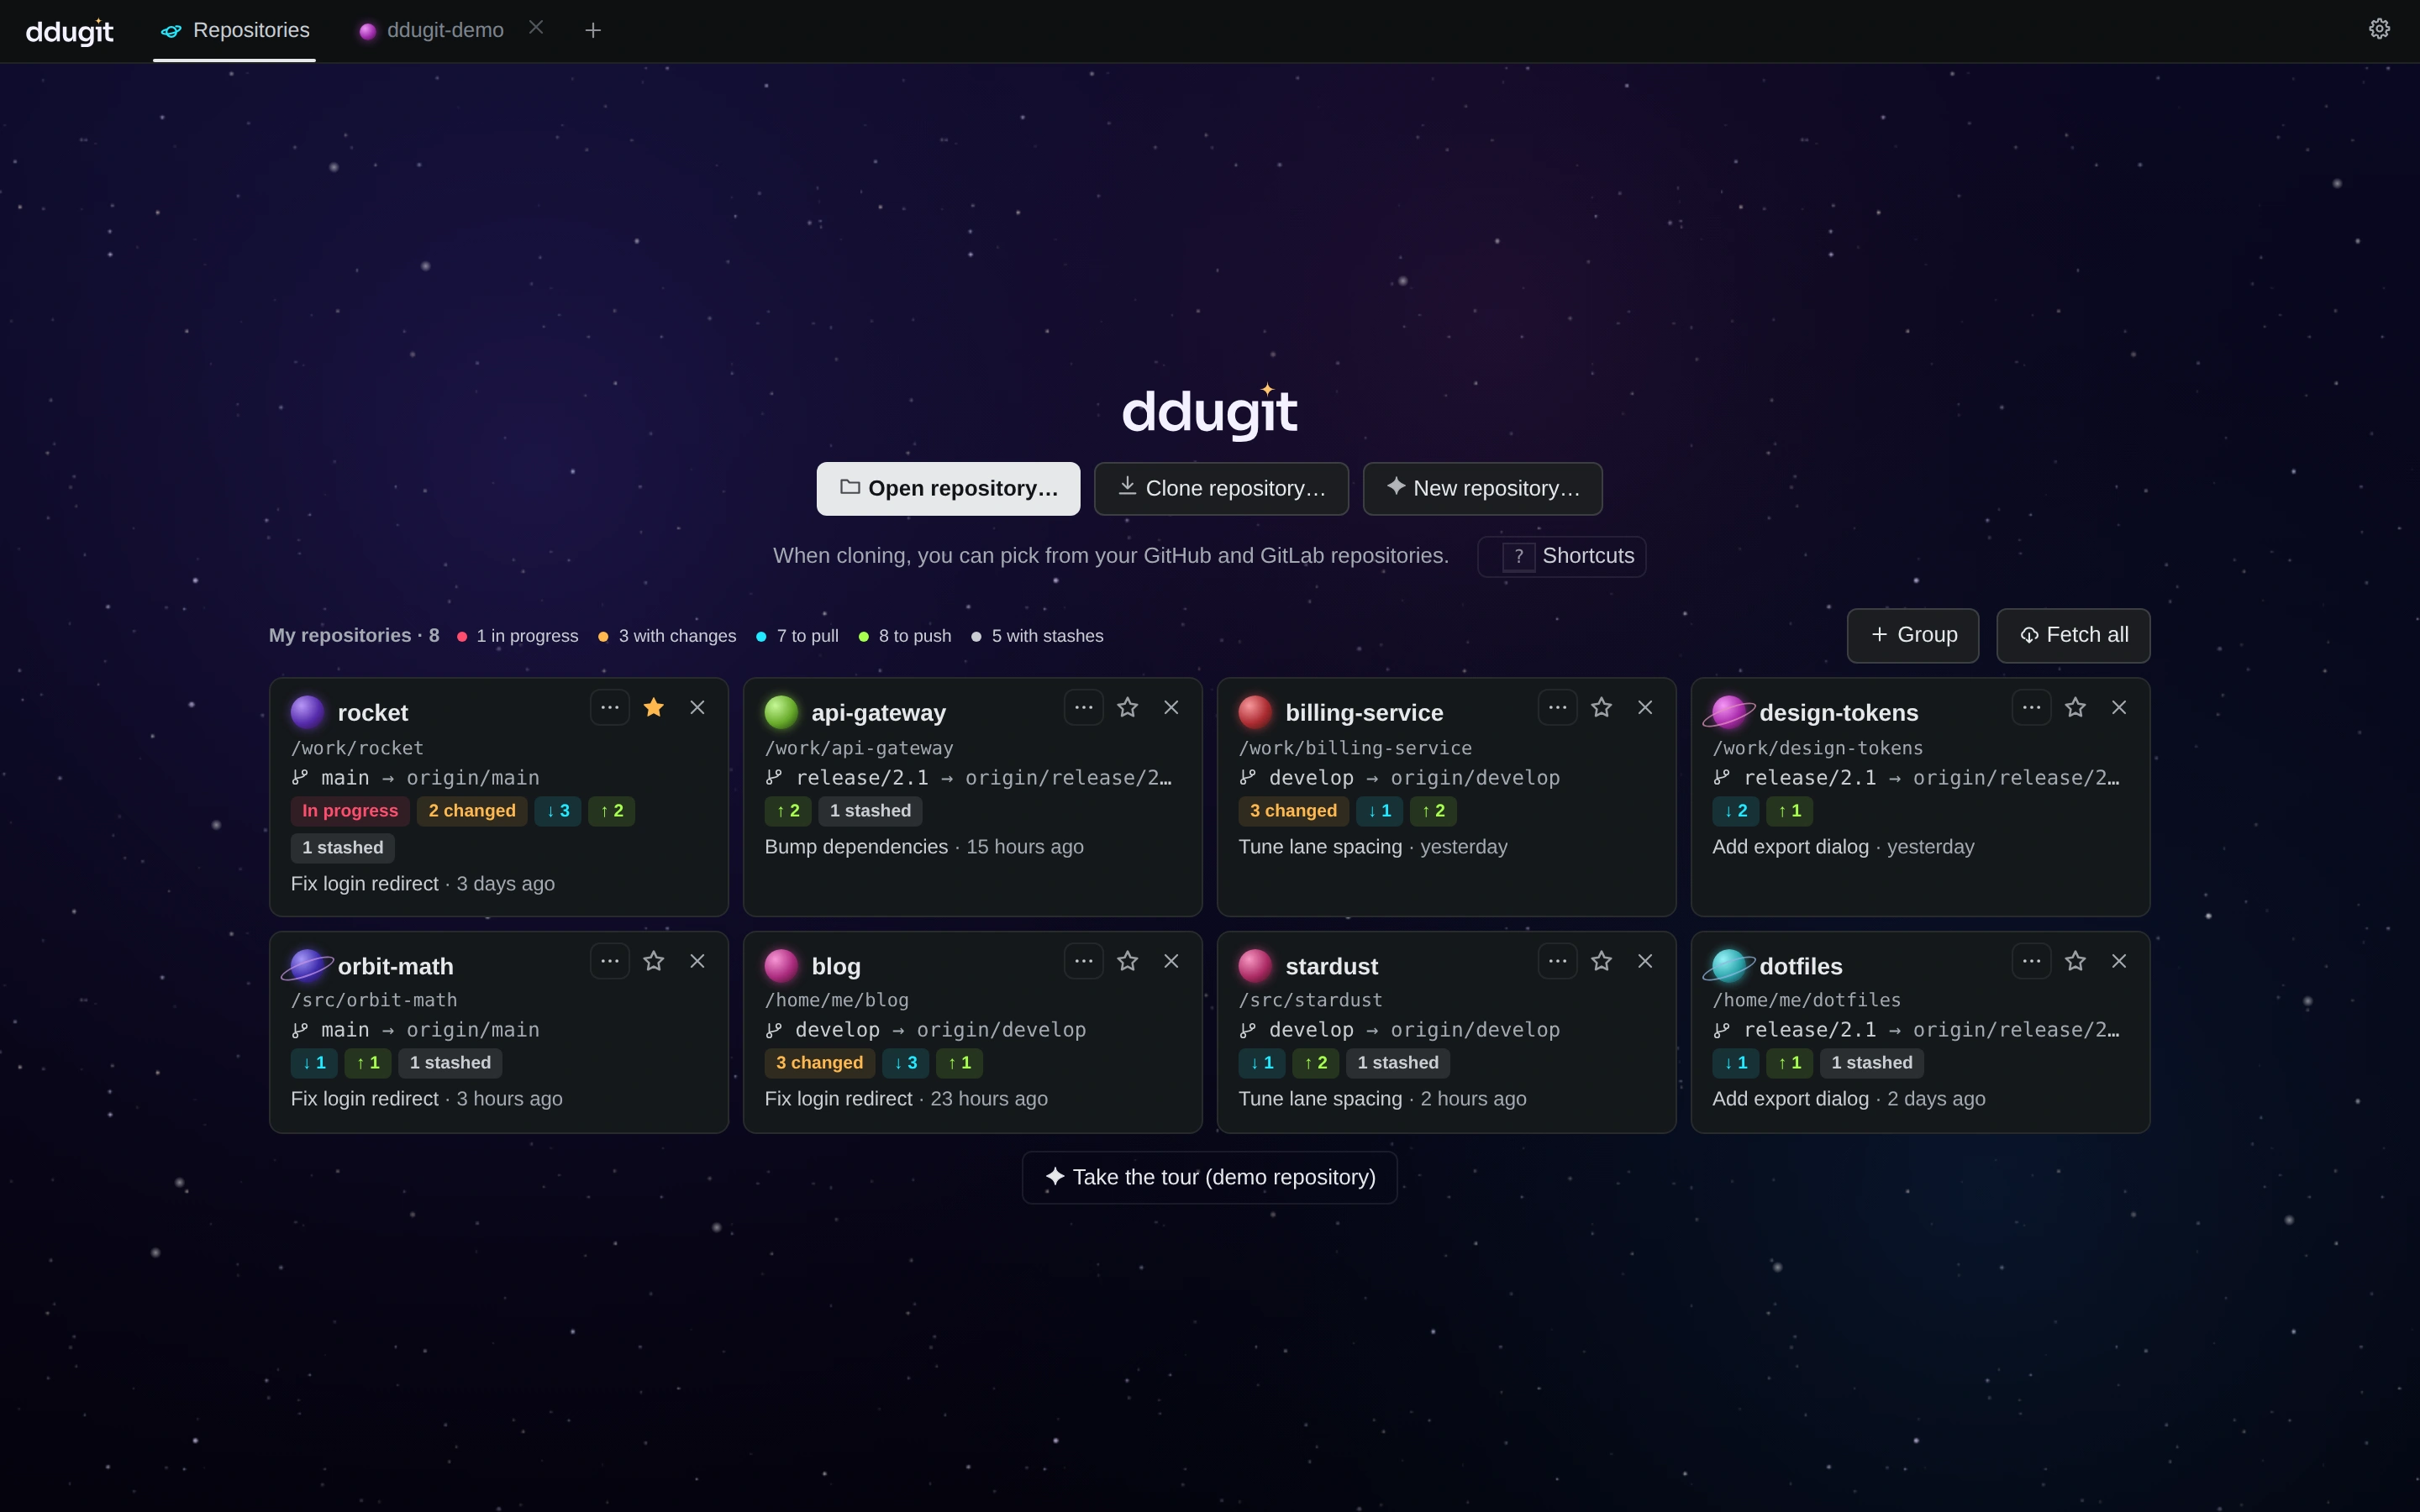
- Open repository… asks for a folder and opens it in a tab.
- Drag a folder onto the window. Drop a repository folder, or any file or folder inside one, and ddugit opens the repository it belongs to. If the folder isn't in a Git repository, ddugit asks Not a Git repository and offers Create here.
- Recent repositories. Every repository you open is remembered. Click the star to Add to favorites: favorites stay at the top and are never pushed out of the list. Remove from list forgets a repository without touching its files.
Once you have opened a few repositories, the start screen shows them as cards in My repositories, with each one's branch, changes, and commits to pull or push. That dashboard is covered in many repositories.
Want to look around first? Take the tour (demo repository) opens a practice repository with a short tutorial. Nothing you do there touches your own work.
Clone a repository
Click Clone repository…. The Clone repository dialog lets you choose a source:
- URL: paste the Repository URL (HTTPS or SSH). The HTTPS / SSH switch above the field converts a GitHub or GitLab address from one form to the other.
- GitHub or GitLab: pick from your own repositories. The first time, click Connect GitHub (or GitLab). If you're signed in with
gh auth loginorglab auth login, that token is used; otherwise paste a token, which is stored only in your computer's keychain. Change Server for GitHub Enterprise or a self-managed GitLab.
Under Save to, click Choose… to pick the parent folder. The Folder name follows the URL until you edit it, and the full path appears below. ddugit remembers the parent folder for next time. Click Clone to start; progress shows in the dialog, and the repository opens in a tab when it's done.
Clone options
Open Advanced in the clone dialog for these:
- Branch: the branch to check out. Leave it empty for the default branch.
- Recent history only (shallow): clone only the last few commits, with the number in Commits (
--depth). - This branch only: fetch just one branch (
--single-branch). - With submodules: check out submodules as part of the clone.
SSH addresses
When the URL is an SSH address (git@github.com:owner/repo.git), a Set up SSH section appears with four steps:
- SSH key: use your existing key, or click Generate key to create an ed25519 key in
~/.ssh(without a passphrase; add one later withssh-keygen -p). - Add the public key to your account: Copy public key. For GitHub and GitLab, Open github.com SSH key settings (or gitlab.com) takes you to the right page.
- Check server. For GitHub and GitLab, ddugit compares the server's fingerprint with the one they publish. Click Trust this server when it matches. For other servers, compare it with the fingerprint from the server's administrator first.
- Test the connection. You should see Authenticated.
On Windows these steps need OpenSSH (ssh and ssh-keygen), which comes with Git for Windows.
When sign-in fails
ddugit never shows terminal login prompts, because a hidden prompt would freeze the app. If the server rejects you, an Authentication required dialog explains the one-time setup for your system and the address you used: the macOS keychain, Git Credential Manager on Windows, or the SSH steps above (with the terminal commands under Use a terminal instead). Each command has a copy button, Show Git output shows exactly what Git said, and Retry takes you back to the clone dialog with everything filled in.
Start a new repository
Click New repository… and choose the Folder for the new repository. ddugit runs git init there with main as the first branch and opens it. If the folder is already a repository, it just opens it. An empty repository says No commits yet. Press + to make the first one.: the + on the map opens the commit panel.
Tabs
Each open repository gets its own tab in the row at the top of the window.
- The first tab, Repositories, is the home screen: the start buttons and your repositories. Press ⌘/Ctrl + 0 to go there.
- + (or ⌘/Ctrl + T) opens a new tab with the start screen, to open, clone or create another repository.
- Close a tab with its ×, a middle-click, or ⌘/Ctrl + W.
- The ▾ on the current tab opens the repository menu: Open repository…, Clone repository…, New repository… and your recent repositories.
- Switching tabs keeps each one as you left it: position on the map, selection and open sheets. Only the tab on screen listens to the keyboard and watches its files.
- The desktop app reopens the tabs you had open the next time you start it.
A tour of the window
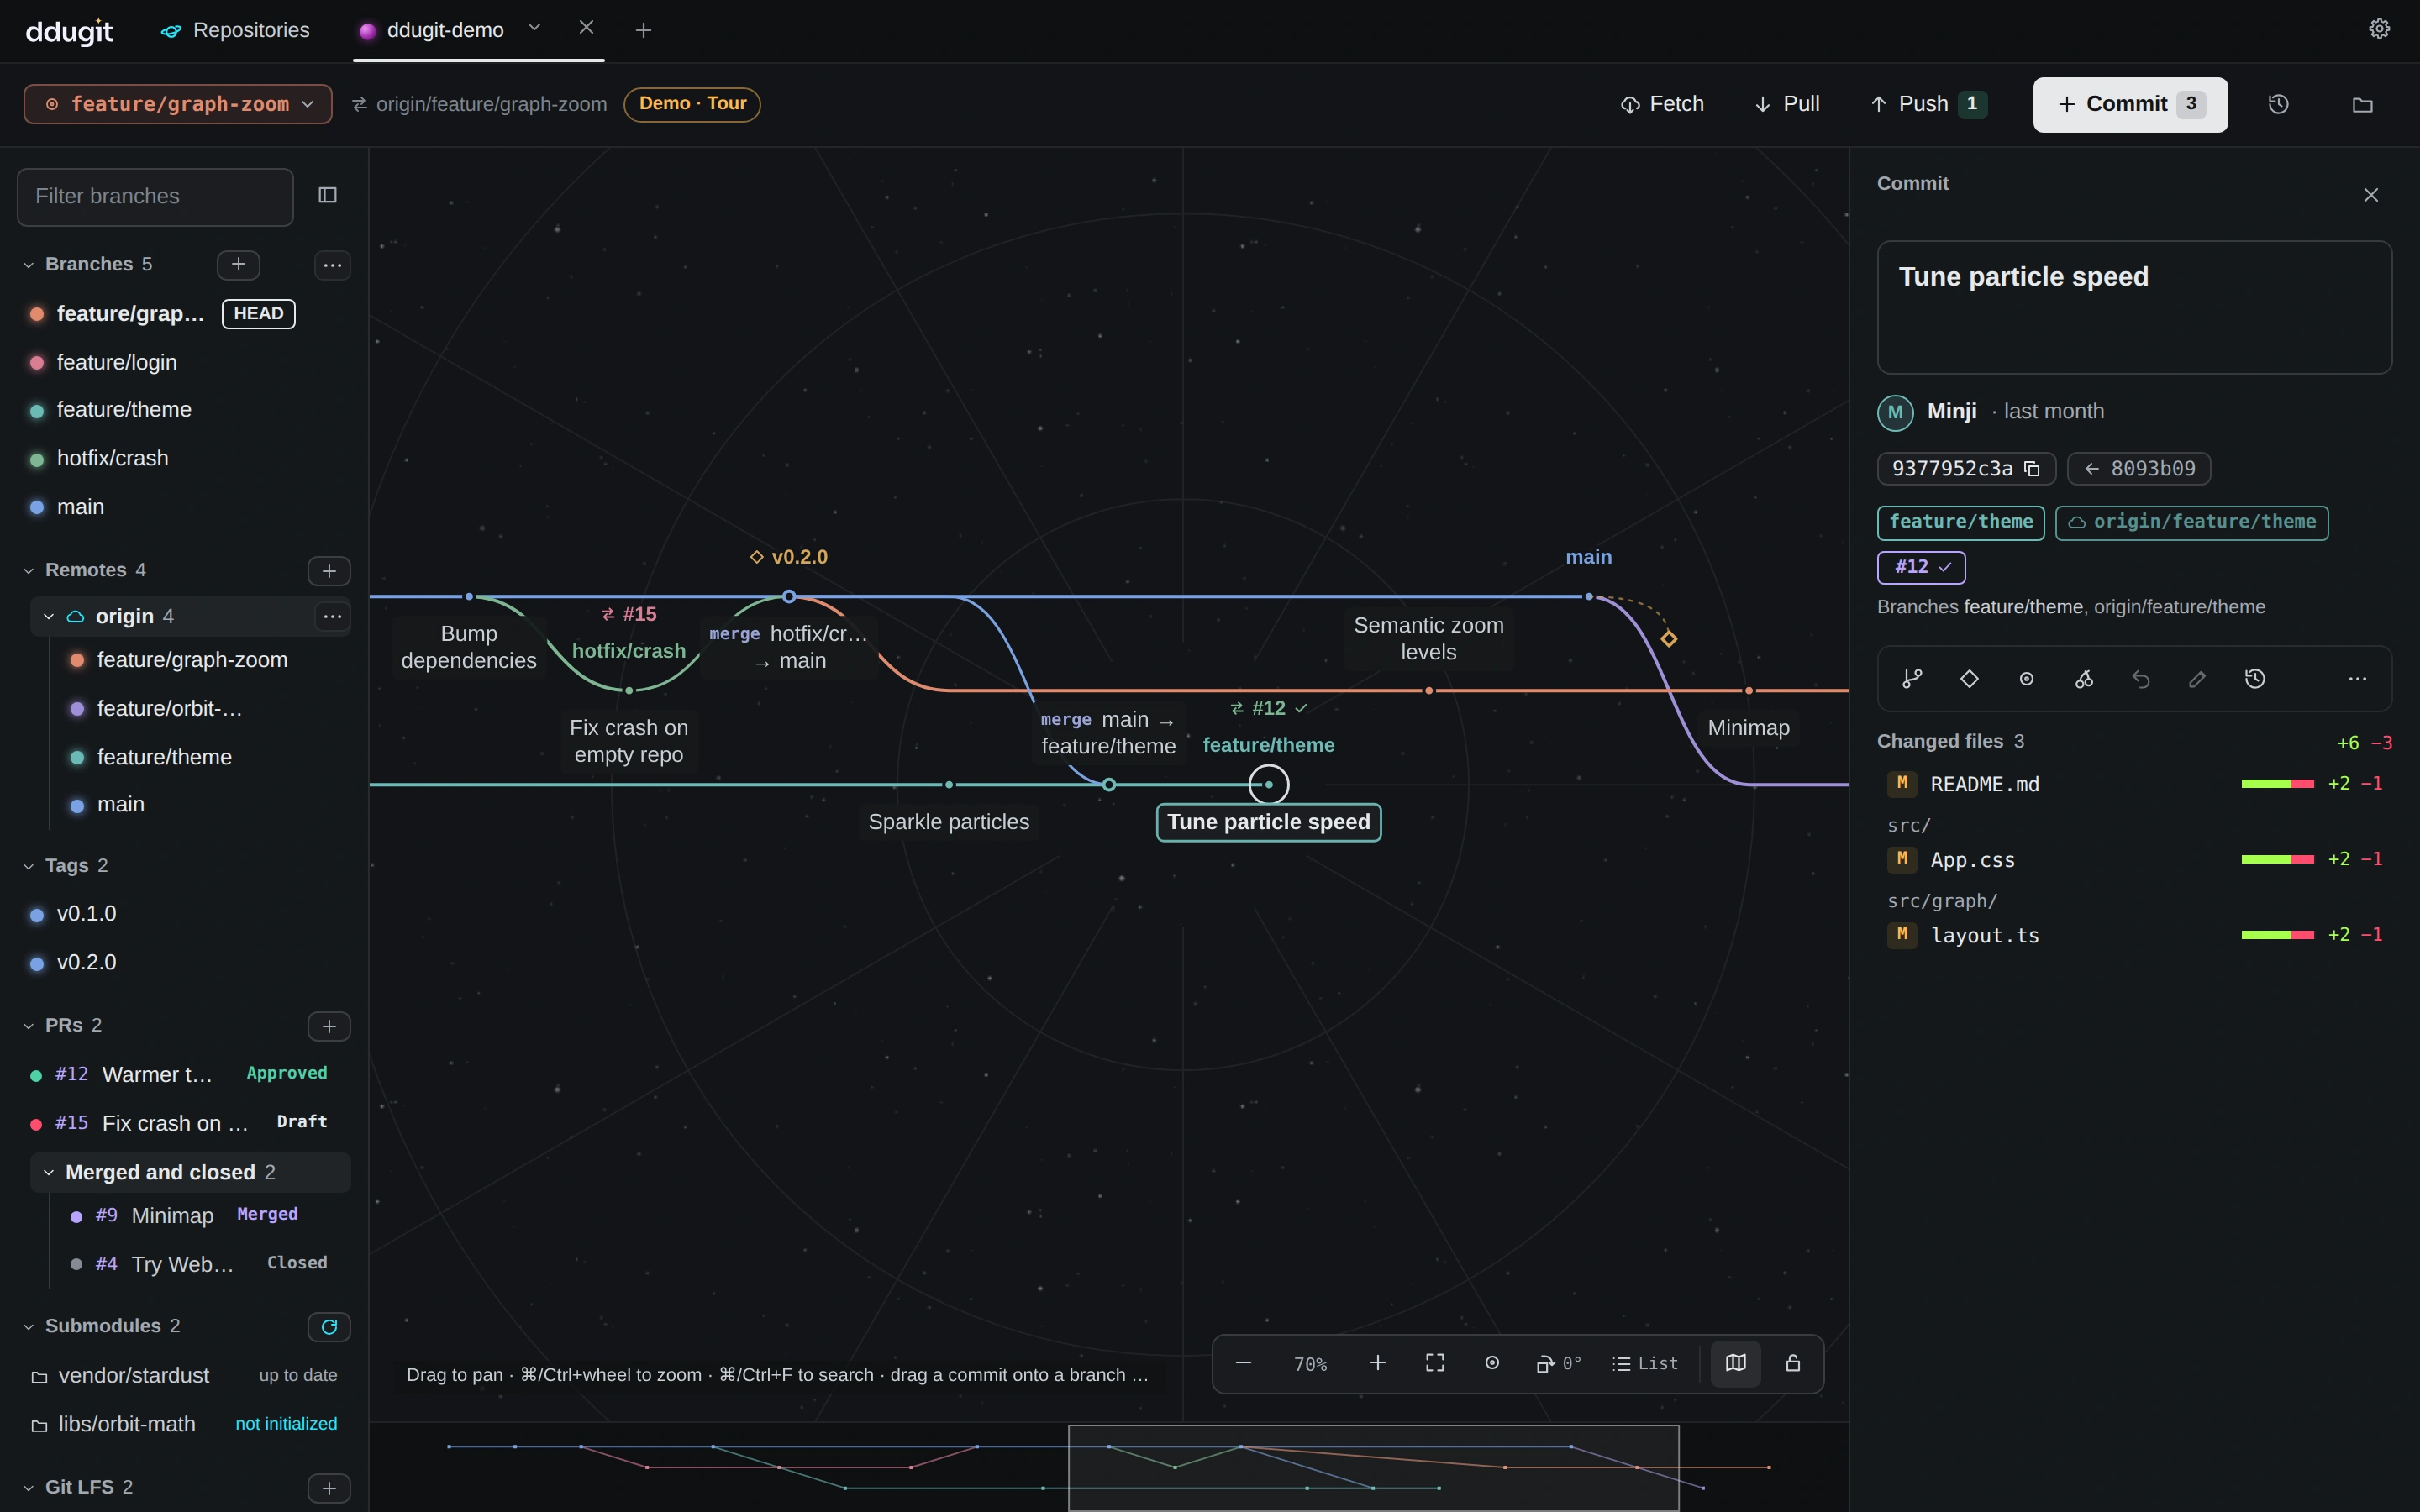
Tab row
The wordmark, your tabs, and Settings (the gear) at the far right. On macOS the window buttons sit at the start of this row; on Windows, at its end. Drag an empty part of the row to move the window, and double-click it to maximize.
Top bar
- The current branch, with ▾ to switch branch, and the upstream branch it tracks.
- Fetch, Pull and Push. Pull shows how many commits are waiting on the remote; Push, how many you have to send. A running transfer shows its percentage. See branches and remotes.
- Commit, with the number of changed files. It opens the commit panel (commits and changes).
- A history button for the Undo history (reflog), and a folder button to Open in file manager, terminal or editor.
Sidebar
Filter branches at the top narrows every list. Below it come Branches, Remotes (a fold per remote) and Tags, then sections that appear when the repository has them: stacks, pull or merge requests, submodules, Git LFS, Worktrees and Stashes. Click a section title to fold it. Click a branch to focus it on the map, double-click it to check it out, and right-click it for its menu. Collapse the sidebar to a thin rail with ⌘/Ctrl + B, and drag its edge to resize it (double-click the edge to reset).
Branch map
The middle of the window is the history: one dot per commit, one lane per line of work. Drag to pan, zoom with ⌘/Ctrl + wheel, and press H to come back to HEAD. The controls at the bottom right zoom, fit, rotate, switch to a list, and toggle the minimap and map lock. Everything about the map is in reading the branch map.
Right panel
Click a commit and the inspector opens on the right: message, author, SHA (click to copy), parents, branches that contain it, the changed files, and buttons for what you can do with it. The same place holds the commit panel when you're committing, and a stash's details when you click a stash. Drag its edge to make it wider.
Sheets and banners
Larger tasks open in a sheet that slides up under the map, so the history stays in view: diffs, resolving conflicts, rearranging commits, backports and branch cleanup. Drag the diff sheet's top edge to resize it, and press Esc to close it. When an operation is in progress, such as a merge, rebase or bisect, a banner above the map says so and offers the next step.
Notifications
Short messages (toasts) report what finished or failed. A toast stays while your pointer is over it, so you can read or select its text. Error messages have a copy button, and an unexpected error also has a Report button that opens a problem report with that error filled in.
Next
- Reading the branch map: move around the history and make it your own.
- Commits, staging and stashes: make your first commit.
- Settings and keyboard shortcuts: press ? in the app to see every shortcut.